
Shadow Multi Cast - How to Install LT Version
The setup process is very easy to do. In most instances all you will need to do is close AutoCAD, the run the setup file to install the Shadow Mulit Cast software.Once you open AutoCAD, the Shadow Multi Cast menu should appear near the top right hand of the AutoCAD window.
If it doesn't appear, you may need to follow some simple manual instructions listed below.
If you still have trouble after following this guide, send me an email and I will help you one on one.
I have made the steps as basic as possible so you hopefully don't get lost. The whole process shouldn't take more than 5 minutes. Once it is setup, you only have to manually set it up again if you reinstall AutoCAD
Installation of Files
| Step 1 Double click on setup file. A menu screen will appear. Click on 'next' |
 |
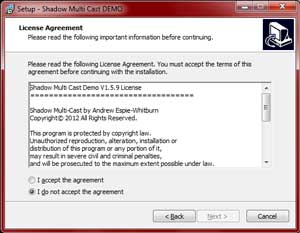
Step 2 You will be asked if you accept the License Agreement. If you do, select the 'I accept the agreement' then click 'next' |
 |
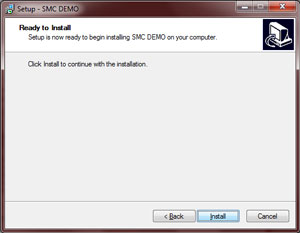
Step 3 The software is now ready to install the files. Click on 'install' button |
 |
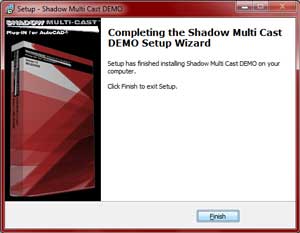
Step 4 The post installation menu screen appears click 'Finish' |
 |
Turning on the Menu Bar and setting Directory Paths
| Step 5 Open your version of AutoCAD you are going to setup Shadow Multi-Cast in. |
 |
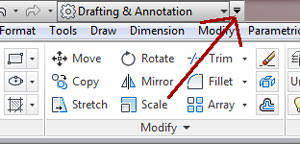
| Step 6 Once AutoCAD is open, at the top of the screen above the modify panel there is an arrow facing down. Click on the arrow. If you cannot see this arrow, at the AutoCAD command prompt type: MENUBAR then press Enter then type 1 then press Enter |
  |
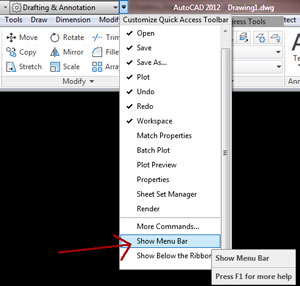
| Step 7 A drop down menu will appear. If not already selected, left click on the 'Show Menu Bar'. This will show the menu bar at the top of the screen so you will be able to access the Shadow Multi-Cast menu once it is setup. |
 |
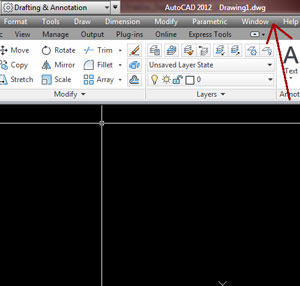
| Step 8 The menu bar should now be visible |
 |
| Step 9 At the AutoCAD command prompt, type 'Options' then press 'enter' |
 |
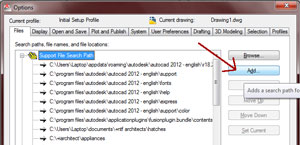
| Step 10 The options menu will appear. Click on the 'Files' tab as shown if it isn't already selected. |
 |
| Step 11 left click on 'Supprt File Search' then left click on 'Add' then click 'Browse' |
 |
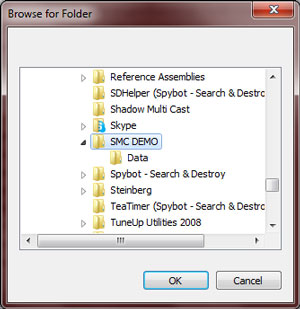
| Step 12 A menu will appear. Go to C:/Program Files/Shadow Multi Cast LT Then click on OK. This will add the directory to AutoCAD so it can find the files needed when generating shadow diagrams. |
 |
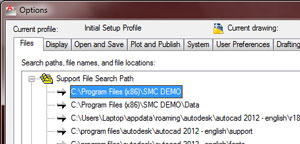
| Step 13 AutoCAD will now have 1 folder added to the 'Support File Search Path" Make sure you click 'Apply' then Click OK and you will be back in the AutoCAD model/paper space. Note: The image to the right shows the directory names for the Demo version. |
 |
Load Menu file
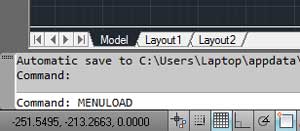
| Step 14 Once you are back in AutoCAD, at the command prompt type Menuload. |
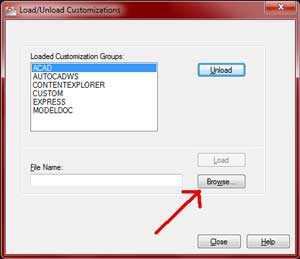
 |
| Step 15 A window will appear. Click on the browse button and navigate to the Shadow Multi Cast LT directory. C:/Program Files/Shadow Multi Cast LT |
 |
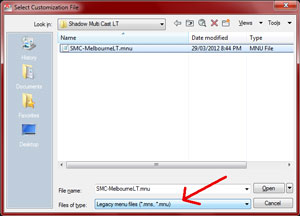
| Step 16 Make sure MNU file types are selected and select the menu then click on Open |
 |
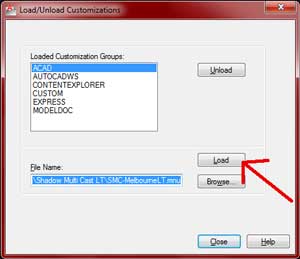
| Step 17 After clicking Open, click on the button Load to load the menu. |
 |
Shadow Multi-Cast should now be set up for use. To use Shadow Multi-Cast, click on the Shadow Multi-Cast menu on the
AutoCAD menu bar.